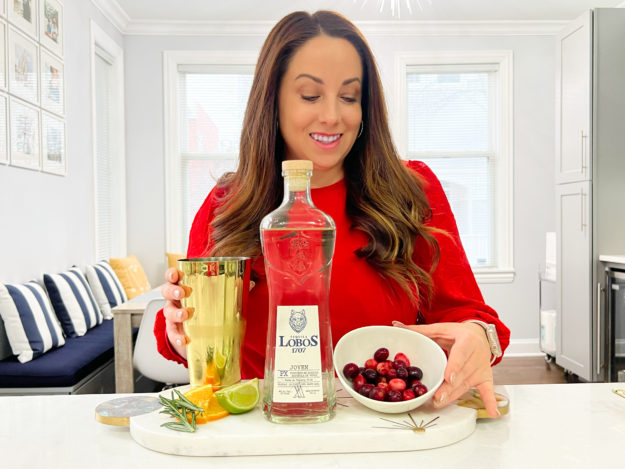
We made it! It’s the holiday season and my favorite time of year to entertain. This year we are hosting friends and family for the holidays so I wanted to treat them to one of my favorite festive cocktails – The Santa Rita! #ad
You can make this a punch if you’re hosting several people, too. For my main ingredient, tequila, I like to use Lobos 1707. If you live in the Chicago area you can find it at Mariano’s.
A few reasons why I love the award-winning Lobos 1707 tequila besides its smooth elevated taste is Lobos 1707 itself is minority-owned and female-led. For all my basketball fans, Lobos 1707 is backed by cultural icon and basketball legend Lebron James. How cool is that?!
Okay, back to my Santa Rita which is a holiday spin on a classic margarita. What you’ll need for this festive cocktail:
2 oz. of Lobos 1707 Tequila
3 ounces Cranberry Juice (You can mix red & white cranberry juice for color)
1 oz Lime Juice
1 tbsp of Simple Syrup
1 oz Grand Marnier
Garnish with lime slice, orange slice, cranberries, rosemary
If you want a fizz – add a splash or two of tonic or soda water
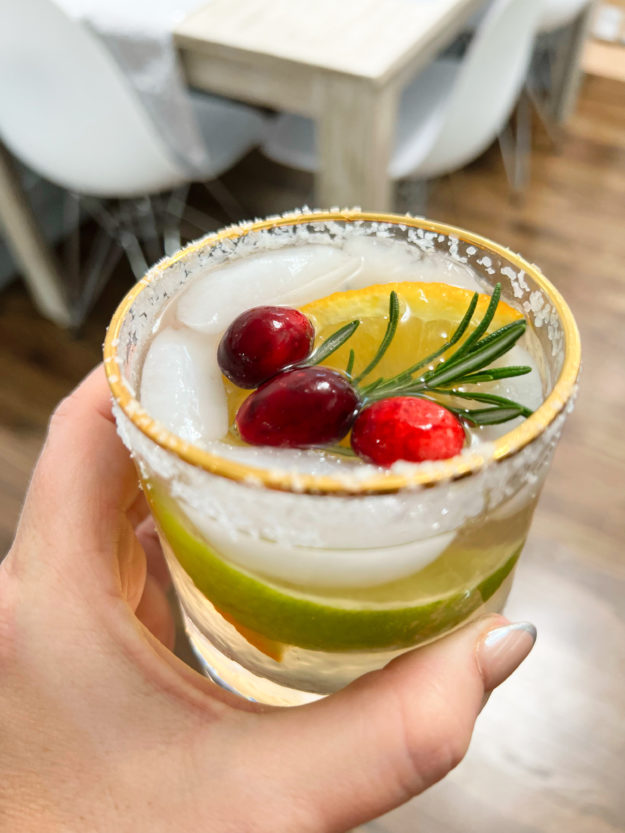
Directions:
Add tequila, cranberry juice, lime juice, simple syrup, and Grand Marnier to a shaker over ice.
Shake vigorously for 3-5 seconds.
Rim your glass with salt OR sugar and add ice.
Pour mixture into the glass over ice.
Garnish with a lime slice, an orange slice, a few cranberries, and a stick of rosemary.
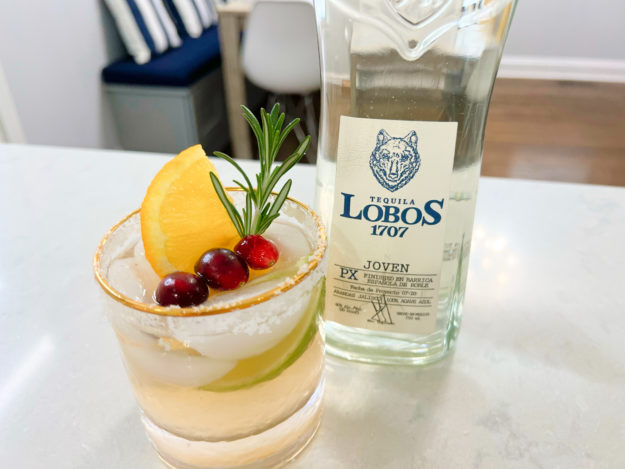
Not only does it look pretty but it tastes delicious, too! I know you’ll love this holiday favorite just as much as we do. Merry Christmas and Happy Holidays.
“Pick up a bottle at your local Mariano’s or you can purchase online. Cheers!
Thanksgiving is one of my favorite holidays! Ok, if I’m being honest – I love all the holidays. Any reason to celebrate and eat – I’ll toast to that!
Thanksgiving is so important to me because I love to cook and I love seeing my family’s face when they taste what I’ve made. In fact, I gave birth to my second son two days before Thanksgiving and still made sure I was home in time to make a turkey. That’s how die hard I am.
Ten years ago I could barely make a grill cheese, let a lone a turkey without catching the kitchen on fire….so I’d say I’ve come a long way. I wanted to share my top dishes that friends and family always request when they join us for Thanksgiving. I hope you’ll love them as much as we do.
Of course the number one item is the turkey. The key to a great turkey is brining it overnight.
In a large stock pot fill with broth. I’ve used vegetable and chicken in the past. Either are fine.
Add a cup of sea salt to the broth.
Add a few of your favorite seasonings like rosemary, sage, or classic chicken seasoning.
Place your defrosted turkey (after you’ve washed it off) in the stock pot, cover with foil and place in refrigerator over night. I like to at least give it 12 -15 hours to brine.
Next day remove turkey right before you’re ready to start cooking it.
Melt a stick of butter with garlic, pinch of chicken seasoning, thyme, rosemary and sage. Use this mixture to paste all over outer skin and inside the skin on the breasts. Cover the turkey with foil place in oven. I always put broth in the bottom of the pan as well. You can put your stuffing inside if you’d like too. Bake at 350 for however long it says for your turkey. It’s usually 3/12 to 4/12 hours for a 10-18 pounder. The last hour I remove the foil to let the top get crispy. I periodically baste the turkey with the juices that form in the bottom of the pan.
Slice up and serve. Delicious!
Next up – homemade mac and cheese. A must have especially with kids in attendance.
I use gluten free pasta and they don’t even know the difference. My favorite brand is Nature’s Earthly Choice Quinoa Pasta Blend Fusilli. You can find it at your grocer or even on Amazon.
Bring water to a boil and add in pasta. You can use any pasta you like. I usually do elbow or spiral. I add one full bag which is about 17 ounces so we will have lots of leftovers. Follow instructions on bag as to how long to boil. Make sure it’s nice and soft before straining.
While you’re waiting for pasta to cook – melt a stick of butter or ghee in a sauce pan. Stir in enough flour (I used gluten-free flour) to make a roux about 2 tablespoons should do it.
Slowly pour in milk (about 3 cups). You can use a milk alternative like coconut or Ripple, but it won’t be as creamy.
Add in 2 cups shredded cheddar cheese and 1/2 cup parmesan. Stir until desired consistency. No one will get hurt if you add in a little more cheddar if you know what I mean. Do a taste test to see if you like the cheesy-ness.
When you get to desired consistency add a couple pinches of salt and paprika.
Strain pasta and pour into baking dish.
Take cheese mixture and pour over pasta. Mix all together so pasta is in cheesy heaven.
Place in oven (or fridge covered if you made it early) and bake for 20 minutes at 350 degrees.
BONUS… if you want yummy bread crumbs on top – melt 1/4 stick of butter in saucepan, throw in the bread crumbs to brown and then sprinkle on top of the mac and cheese and then put it in the oven. So yummy and a Thanksgiving classic in our house.
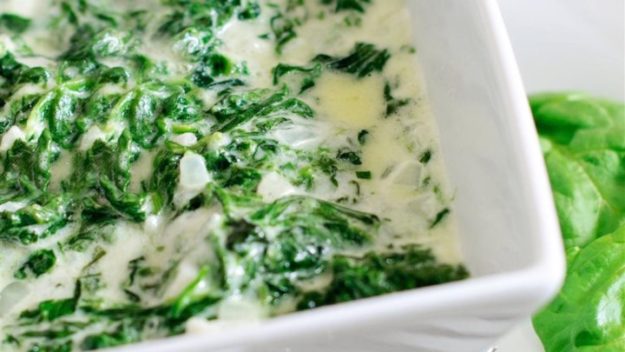
Then we have creamed spinach. Yes, we do green bean casserole too – but I’m sure you’ve seen a million of those recipes. So, spinach it is.
Get two bags of frozen spinach (you can use fresh too, but remember spinach does a disappearing act when you cook it – so get a lot!), coat the bottom of a sauce pan with olive oil and cook the spinach down. Empty on plate and hold off to side for now.
Sauté a clove or two of garlic in some olive oil or butter in the saucepan.
Add diced white onion – about 1/4 cup. If you’re an onion lover you can add a little more.
When these are cooked to your desire add in 1/4 cup of butter and melt down.
Add in a few sprinkles of flour to create a roux. You don’t need much.
Pour in 3/4 cups of heavy cream. You can use milk as well but it won’t be as thick.
Grab your cooked down spinach and add it to the pan and stir.
Sprinkle 1/2 cup of grated parmesan cheese on top and stir.
Add a touch of salt and pepper and serve.
I find this is best served right after completed verses putting in fridge and re-heating later. Enjoy!
And for my last fav item on the menu – deviled eggs!
Bring water to a boil.
Add 6-12 eggs (however many you need for your attendance)
To boil to perfections it’s about 10-12 minutes.
Remove eggs and put in a bowl under cold running water for 2 minutes.
Now you’re going to LOVE ME.
Get a small plastic container (think Tupperware) with a lid.
Place 4-5 eggs in there and fill it half way to 3/4 way with water.
Put lid on tight and SHAKE like your life depends on it.
Open container and the egg shells you’ll see will be all cracked.
Start peeling and see how easy the shell just falls off the egg! NO more back breaking stance over the sink peeling these darn things for an hour!! I know…. you’re welcome.
Now back to making them.
Once you peel all the eggs. Slice them each in half and empty all the yolks into a bowl. Place open face eggs on serving platter.
Add a table spoon of mayo into bowl.
Add a few teaspoons of mustard to bowl.
Add a few hearty pinches shredded cheddar cheese.
Add (or not) bacon bits! I usually cook 3-4 slices and break it up.
Add pinch of salt.
Mix up the items above until you get a cream consistency. If you want it to be more creamy add a little more mayo and mustard.
Take this mixture in spoon fulls and add them to the top of the open faced eggs.
Once you’ve filled all the eggs, sprinkle paprika over all of them. You only need a little.
Another garnish you can add is thinly sliced green onion.
Try not to shove all of them in your face at once because they are so de-lic-ous!
I hope you’ll add these recipes to your family’s traditions! Happy Thanksgiving, y’all!
In honor of Super Bowl, I thought I’d share my most requested recipes. As I explained in an earlier post, my cooking skills have come along. Now friends actually enjoy eating at my house and can’t wait to see what’s on the menu.
One of my staple recipes is White Bean Chicken Chili. It’s a quick and easy dish to make that is always a crowd favorite. My kids love it, too!
Here’s what you’ll need:
(2) Chicken Breasts cooked and shredded
(2) 15 oz cans of Great Northern Beans
(1) 10.5 0z can of Cream of Chicken Soup
(2) cups of Sweet White Corn (frozen)
(1) Chopped White Onion
(2) Cloves of chopped Garlic
(4) cups of Chicken Broth
(1/4) cup of Butter (you can use Olive Oil if you prefer – 2 tablespoons)
(1) teaspoon Chili Powder
(1/4) teaspoon Cumin
(1/4) teaspoon Paprika
Pinch Salt & Pepper
First, I like to season the chicken breasts with cumin, paprika, salt and pepper and bake them in the oven, 350 degrees for 25 minutes. While the chicken is cooking I prepare the chili.
In a dutch oven or large stock pot:
Melt the butter over low/medium heat.
Add the onions and garlic and let them soften.
Add sweet white corn.
Sprinkle a portion of the Chili Powder, Cumin, and Paprika into the mixture.
Stir and let cook for 1-2 minutes.
Add great northern beans.
Sprinkle remaining Chili Powder, Cumin, and Paprika into the mixture.
Stir and let sit for 1-2 minutes.
Add can of Cream of Chicken soup.
Stir and let sit for 1-2 minutes.
Add Chicken Broth. Pour in one cup at a time to find the thickness you like and adjust accordingly (You may not need it all).
Bring to a soft boil. Stir then let simmer on low heat for 10-15 minutes.
Once the chicken is done, shred and add to the chili. Stir and let simmer for another 5 minutes. Add additional spice mix to your taste. *Sometimes I’ll just additional chili powder to my individual bowl as I like it spicier than my kids.
Garnishes to top:
Lime
Avocado – my personal favorite!
Cilantro
Sour Cream
Cheese
Green onion
Tips: Want to save time?
Throw all the ingredients in a Crock Pot and set on low for 4-6 hours.
Use a whole cooked rotisserie chicken from your grocer. Slice, shred, and throw in the pot!
If you’re like me – you used to cringe at the thought of one of these little green balls. Once I tried them, the bitter after taste was enough for me to never try them again, until – a few years ago. Then it was love at second site! This little side dish quickly became my favorite while eating out and I wanted to duplicate that deliciousness at home. It took me a few times to get that restaurant style taste in my own kitchen, but I think I’ve found it. You’re in luck, too, because I’m sharing it with you!
What you’ll need:
A bag of brussels sprouts – I get the already packaged bags in the produce section at grocery store.
Olive oil
Balsamic Vinaigrette
Salt / Pepper
white onions (or dried minced onions – either work fine)
herb and garlic seasoning – mine is from Whole Foods
parmesan cheese – grated
bacon (if desired)
Empty your sprouts out of the bag, wash them and cut them all in halves. When they are cut in halves – they roast much easier and you get that crispy outer layer. YUM! If you leave them whole you usually have to cook them about 15-20 minutes longer. Which ever you prefer is fine.
Take a cookie sheet or oven friendly baking pan and spread olive oil to cover entire bottom of pan, then spread out all the sprouts. You don’t want them on top of each other – so make sure you have a large enough pan. Drizzle olive oil on top of the sprouts and then roll them around in the pan to make sure they are fully covered in a thin layer of olive oil.
Next sprinkle salt and pepper, herb and garlic seasoning, and the minced onions all over top of sprouts. You can use white onions, cut them up, and throw them in – but let’s be honest here, I need easy since I have two crazy boys begging me for food all the time. Cutting up an onion is an extra time consuming step – so I use the dry minced ones.
Turn oven on 350 degrees, once ready pop the pan in the oven for 20 minutes. After 20 minutes, pull the pan out and flip over the sprouts and sprinkle on grated parmesan cheese on top. Bake for another 10-15 minutes until desired softness.
Plate up and sprinkle a little more parmesan on top – because why not? You can add bacon to these bad boys too, if you have the time.
Serve and enjoy! My boys, who usually whine anytime I put something green in front of them, eat these right up! Here’s his plate to prove it! Mom win!
I’m a foodie and a Chicagoan – luckily those compliment each other well. Chicago is known for their food innovation, the hottest trends, the incredible chefs and of course, our pizza. At any given day our “must-have” pizza joints have a line around the block, yet locals and tourists alike will wait hours to get their mouths around a slice of yummy Chicago pie. And, who can blame them?
Pizza, one of my favorite dishes, was recently removed from my diet due to some unknown food allergies. To my good fortune the amazing team over at Rossopomodoro, the official pizza partner for Eataly Chicago, invited me and my son to try out their four new doughs – one of which is gluten and egg free! Eataly, a newer Chicago staple, is an Italian marketplace featuring a plethora of amazing italian delicacies, cafes, counters, restaurants, and a cooking school. At Eataly you can eat, shop and learn.
Prior to my Eataly visit, I was honored to connect with Simone Falco of Naples, Executive Chef & Owner of Rossopomodoro West Village and President and CEO of Rossopomodoro at Eataly USA, and ask him a few questions.
Simone Falco was born in into into a family of sportsman and entrepreneurs. When Simone grew older he became a rugby player and obtained a PhD from the University of Naples Federico II, one of the oldest Universities in Europe. Since he was very young, Simone has worked in the family company to learn the proper skills needed to run a successful restaurant business, leading into the launch and development of several new restaurant locations in Italy and abroad. Rossopomodoro in New York City’s West Village – an outpost location of the Rossopomodoro’s U.S. operations at Eataly New York (Flatiron & Financial District), Chicago, Boston, and San Paolo – has been carrying on the tradition ever since its opening in 2014.
He designed the restaurant’s menu to embody the brands manifesto and presents dishes that are simple, seasonal, straightforward, healthy and flavorful – and he goes way beyond just pizza & pasta. Simone would describe his personal style as classic Neapolitan.
I started out the interview asking Chef Falco what passions of his led him to pizza.
“Growing up in Naples, pizza was our breakfast every weekend. How could I not be attracted to pizza?”
As someone with food allergies and a passion for health, it’s refreshing to see more and more offerings that cater to a healthful lifestyle without giving up the things we love – like pizza. What’s the secret to maintaining great taste yet being healthy also?
“The secret is high quality ingredients (wild, organic, no chemicals) and good sourcing.”
As you know, Chicago is certainly a pizza town. What excites you most about these four new kinds of dough and how are they different from the others we can find in the city?
“We decided to launch the four doughs in Chicago because it is THE pizza city. We wanted to bring something truly Neapolitan to Chicago and something different than everyone is used to.”
Last question, and it’s the obligatory one. You may know that New York and Chicago have an ongoing pizza war. So, which would you say is your favorite between the two signature styles? Chicago or New York?
“My favorite is Neapolitan of course but I have an appreciation for all types. Different pizza has different uses. Sometimes I crave a New York slice and sometimes I crave deep dish. Chicago pizza is more of treat because I live in New York.”
Hearing his story and passion for pizza, I was thrilled met his team and head Chef Simone Lavarone at the Chicago Eataly location. While there he prepared several pizzas showcasing their new doughs.
My favorite was this little slice of heaven with a zucchini cream instead of tomato base. Perfection.
There new doughs now available are:
CLASSICA
The Original Pizza Napoletana
This classic-style pizza from Napoli made with “Type 00” flour is the most elegant and complex of all. The long leavening time (24-plus hours) paired with the brief cooking time produces a pizza with a thin, elastic center and a charred, airy crust.
RUSTICA
Old World Innovation
This dough is the precursor to the pizza we know today, originally made from leftover bread dough from bakeries in the suburbs of Napoli. The “Type 1” whole grain flour and slow-rising process yield a slightly sweet and hearty dough.
MODERNA
Classic yet Crispy
This contemporary take on pizza is typical of the coastal towns near Napoli (think: Amalfi Coast). Made with the same “Type 00” flour as the Classica, this dough proofs longer and cooks longer resulting in a lighter, crispier crust that is soft in the middle and never disappoints.
LEGGERA
Light and Gluten-Free
This airy, slightly caramelized crust is made from an innovative blend of corn, rice, and gluten-free buckwheat flours, offering all the flavors of the real pizza napoletana with a lighter base! While the dough is gluten-free, our environment is not, meaning trace amounts of gluten may be present — it is not certified for those with celiac disease.
Needless to say, the pizzas looked beautiful and tasted even better than one can imagine. This is truly pizza reinvented!
My six-year-old, the notorious picky eater, enjoyed the pizzas so much that he asked if we could take them all home to save for later. Bonus – Sunday’s kids get $9 pizzas where they can pick their own toppings and the pizza comes in fun shapes like a heart, bunny, fish or butterfly. How’s that for family friendly?
Eataly Chicago has many spectacular summer promotions and events happening, so mark your calendars and make your way over to see Chef Simone and the Eataly team for some delicious game-changing pizza. Tell them I sent you!
I once put a frozen pizza in the oven on top of a PLASTIC cutting board thinking….well, actually, I wasn’t thinking. Clearly, I had no clue what the hell I was doing. I saw frozen pizzas sitting on that same cutting board many times before and for some reason I thought my roommate had cooked it on there, too. Pathetic, I know. I was a 26-year-old living in a tiny apartment in the city and I’d been using my oven for storage for the better part of six years.
Okay, back to my pizza.
After I slid it in the oven, I sat on the couch and patiently waited as my stomach grumbled. A few minutes later – nose-burning toxic fumes crept into my air space. The smell was coming from the kitchen. I rushed over to open the oven in fear that my delicious pizza was burning, but as it turned out, the plastic cutting board was burning and taking my pizza down with it.
I grabbed an oven mitt and had to pull out both oven racks because the plastic melted into quite a beautiful art piece bonding the racks together. Luckily, I pulled out the racks just before the plastic reached the bottom of the oven, otherwise the melted plastic would have destroyed it.
My roommate ran into the living room when she heard me yelling profanities only to find me holding a mangled piece of plastic attached to metal – and my destroyed pizza. I looked at her and in all seriousness asked, “Do you think we can still eat it?”
Not kidding.
I realized at that moment I should have paid more attention to my mom in the kitchen. She always made delicious home cooked meals for us with such ease. From ages 18-29, I pretty much ate snack food or processed noodles for breakfast, lunch and dinner. My staple items were ramen, crackers, turkey, cheese, pickles, breakfast bars, tortillas with butter and Red Bull. I know, I know. I was so healthy.
Once I got married I stumbled across an article that advised newly married couples to learn how to cook as it saves a ton of money. Money was something we needed, so I set out on a mission.
I called my mom immediately.
“Mom, how do I make chicken?”
Laughing, “What do you mean? You just buy it from the grocery.”
“No mom, like…cook it?”
“Oh.”
“Do I put it in hot water? Will it taste bland?”
She signed. “Oh dear.”
She gave me a few pointers and told me I’d have to learn how to turn on the oven, too.
After our conversation I looked up some recipes online and started a long standing addiction with the Food Network. Thanks to Rachel Ray and a few other shows, I now knew how to turn my oven on – and use it!
Right about this time, I also began a decade long career in the hotel industry, with most of that time being in luxury hotels. I spent a lot of nights in the kitchen learning from renowned chefs and I eventually worked my way up to the Director of Catering position.
Yes, me, the girl who put a plastic cutting board in the oven to cook pizza.
Moral of this story? There’s hope for all of you who don’t even know how to boil water.
Now, I love to cook. People love to come over to my house to eat my food, too! I find prepping food to be therapeutic and seeing my family’s faces light up when they take that first bite makes my heart happy.
Because of my love for food and cooking, I’ve added a food section to the blog! I’ll share all my favorite recipes, many of which my very picky kids love to eat too. I promise there won’t be any plastic making it into your homemade pizza, either.